
Two small orders, placed in ten seconds flat, and they decide whether your account survives the year. Take profit stop loss isn't administrative paperwork you tick off before a trade. It's your defense line and your profit lock, both set before the market has any chance to move against you.
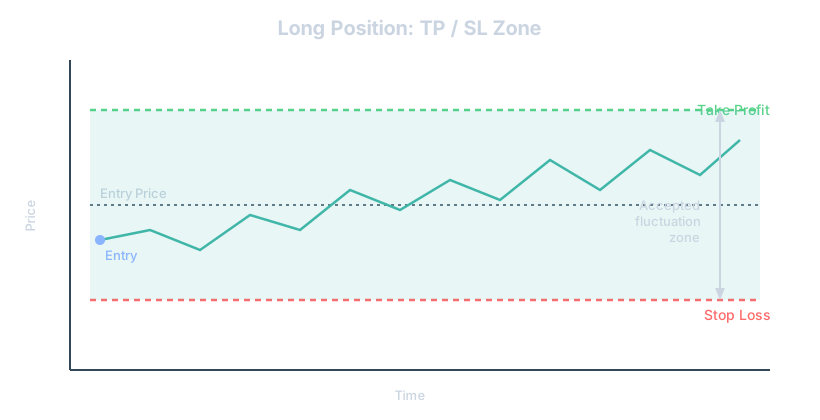
- The take profit closes your position automatically once price hits the gain level you chose in advance.
- The stop loss closes your position automatically once price hits the loss level you decided you could accept.
- The ratio between the two determines whether your strategy can be profitable even with a modest win rate.
- Placement matters more than the number itself: a badly placed stop is a plan collapsing before it even started.
Take profit stop loss: what these orders actually do
A take profit is an order you place to automatically close your position once price touches a gain level you fixed ahead of time. You buy at 100, you set your take profit at 110, and if the market climbs there while you're asleep or at work, the position closes on its own. No need to be glued to a screen, no need to catch the exact candle.
The stop loss works the same way, just in the opposite direction. It's the level where you accept you were wrong. You buy at 100, you know that if price drops to 95 your whole setup is invalidated, so you place your stop there. If it falls that far, the position closes, you take the loss, and crucially, it stops right there. Without that safety net, a 5% loss can turn into a 30% loss overnight during a panic move or simply because you weren't watching.
Take profit stop loss orders exist on nearly every platform out there, whether you trade forex, stocks, crypto or CFDs. They're conditional orders: you define them once, and the system executes on your behalf. That's exactly what lets you trade without staring at a chart from morning to night, and it's also what protects your capital from your own emotional reactions at the worst possible moment.
Why these two orders aren't optional
You'll usually run into two kinds of beginner traders. The first trades without a stop loss because he's scared of cutting a trade too early, one that might have turned around in his favor. The second trades without a take profit because he wants to let his winners run as far as physically possible. Both are wrong, just in different ways.
Without a stop loss, you're exposed to unlimited risk on every single position. That sounds abstract until the day unexpected news drops an asset 15% in a few minutes and you watch your account melt in real time, unable to react fast enough. Without a take profit, on the flip side, you risk watching an 8% gain slide back to zero, then flip into a loss, all because you wanted to 'see how high it goes'. Chasing unlimited upside often costs you a very real, already-earned profit.
There's also a huge psychological dimension behind these two orders. Once they're set, they take the real-time decision away from you, the one you make badly precisely when adrenaline is running high. You're no longer staring at the price asking 'do I get out now', you already answered that question calmly, before the trade even opened. That mechanism is exactly what prevents the kind of revenge trading that follows a badly digested loss: the plan is already written, you don't have to improvise out of frustration.
How to calculate a stop loss that actually makes sense
The first mistake, and by far the most common one, is placing your stop loss based on how much money you're willing to lose rather than on market structure. A trader tells himself 'I don't want to lose more than 50 dollars' and sets the stop at the matching distance, without asking whether that level has any technical logic at all. The result: the stop sits right in a zone of normal noise, and the position gets stopped out before the trade idea even had a chance to play out.
The right method works the other way around. You first identify the technical level that invalidates your scenario: a broken support, a resistance turned support, a recent swing low, the edge of a channel. Only then do you calculate your position size so the distance between entry and that level matches the percentage of capital you're willing to risk. The position size calculator adapts to the stop, never the other way around.
Take an illustrative example. Your analysis shows a solid support sitting 2% below your entry price. You're risking 1% of your capital on this trade. Your position size then needs to be calculated so that a 2% price move corresponds exactly to 1% of your capital, no more. If you want to risk less, you don't drag the stop closer to price, you shrink the position size instead. Beginners mix these two up constantly, and it changes everything over time.
For a deeper dive into concrete placement across different market setups, this guide on where to place your stop loss breaks down the most common cases and the mistakes traders make at that exact stage.
Stop loss based on volatility
Another solid approach is basing your stop on the asset's recent volatility rather than a simple visual support line. An indicator like the ATR (Average True Range) measures the average amplitude of price swings over a given period. Placing your stop at 1.5 or 2 times the ATR helps avoid getting shaken out by plain market noise, while still keeping a reasonable distance in case the scenario genuinely fails.
How to set a realistic take profit
The take profit suffers from the opposite problem of the stop loss: instead of being too tight, it's often wildly unrealistic. Targeting a 20% gain on an intraday trade on a major currency pair ignores the statistical reality of how far that asset typically moves in a day. The take profit needs to be anchored in market structure too: an identified resistance, a Fibonacci level, a prior high, or a price zone the market has already rejected from more than once.
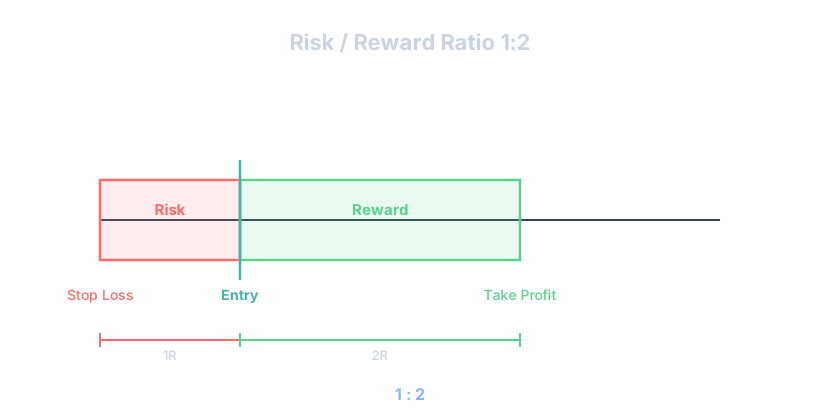
There's also a ratio-based approach that complements the technical one. Once you know the distance of your stop loss, you can define your take profit as a multiple of that distance. If your stop sits 30 pips away, targeting a take profit at 60 or 90 pips gives you a 1:2 or 1:3 ratio. This mechanic is the direct bridge to risk/reward, a topic covered in depth in the risk/reward ratio explained simply.
A trick plenty of experienced traders use: split the take profit into several tiers. You close part of the position at a nearby first target, locking in a gain, and let the rest run with the stop moved up to breakeven. That cuts down the stress of 'what if it reverses right after almost hitting my target', a feeling every trader knows sooner or later.
The link between risk/reward and your win rate
Here's something too few beginner traders truly absorb: you don't need to win more than half your trades to be profitable. With a 1:2 ratio, a 40% win rate is already enough to generate a positive result over time, provided you respect that ratio trade after trade, no exceptions. It's pure math, and it should completely reshape how you approach every single position.
| Risk/reward ratio | Minimum win rate to break even |
|---|---|
| 1:1 | Above 50% |
| 1:2 | Roughly 34% |
| 1:3 | Roughly 25% |
| 1:4 | Roughly 20% |
This table, purely illustrative, shows why so many experienced traders repeat that a good ratio matters more than a good win rate. A trader who wins 70% of his trades but with a 1:0.5 ratio (winning half of what he risks) often ends up net negative. Meanwhile a trader losing six trades out of ten but sticking religiously to a 1:3 ratio builds an equity curve that climbs, slowly but steadily. This idea is developed further in win rate vs profit factor: which one should you watch?.
The mistakes that wreck a good TP and SL setup
We already covered the first one: placing the stop based on the amount you want to lose instead of market structure. The second, just as common, is dragging the stop loss further away mid-trade to 'give it more room' as price approaches it. That's the exact opposite of the whole point of the order: you set it with a clear head, why move it under pressure, precisely when your judgment is at its worst?
A third classic mistake: cutting the take profit early out of fear the gain will evaporate. You see your trade sitting at 1.5% profit, your target was 3%, and fear pushes you to close manually 'just to be safe'. Do it once in a while, no big deal. Do it systematically, and it destroys your risk/reward over the long run, because you're cutting winners short while sometimes letting losers run on the hope they'll turn around.
- Moving the stop loss further away as price approaches it, instead of accepting it as scenario invalidation.
- Removing the stop loss entirely 'just for this trade', usually the exact one where it would have saved you.
- Setting a take profit based on a desired dollar amount rather than an actual technical level.
- Ignoring spread or commission costs that quietly eat into the real distance between entry and target.
- Never moving the stop to breakeven once a meaningful favorable move has already happened.
There's a real difference between adjusting your stop loss according to a plan you defined ahead of time, like moving it to breakeven once a certain profit threshold is hit, and moving it in panic because price is getting uncomfortably close. The first is risk management. The second is fear dressed up as a strategy decision, and it almost always costs you more in the long run than the trade it was supposed to save.
Adjusting TP and SL without breaking your own rules
Trailing your stop as a trade moves in your favor is a legitimate technique, not a violation of discipline, as long as it follows a rule you set before entering the trade. For instance: move the stop to breakeven once price has moved twice the initial risk in your favor, then trail it behind each new swing low on a pullback. That's a mechanical rule, applied the same way every time, regardless of how you feel about this particular trade.
Where it goes wrong is when the rule only exists in theory and gets bent depending on mood. One day you trail tight because you're anxious about giving back gains, another day you leave way too much room because 'this one feels different'. That inconsistency is exactly what a trading journal exposes brutally once you look back at twenty or thirty trades side by side: the pattern of broken rules becomes impossible to ignore.
The same logic applies to take profit adjustments. Extending a target because momentum looks strong is fine if it's a pre-defined scenario, like a continuation pattern you'd already planned for. It's a problem when it's improvised because you're greedy and don't want to leave money on the table. Ask yourself honestly: would you have set this exact adjustment if you'd written your plan an hour ago, calmly, away from the live chart? If the answer is no, you already know what to do.
Take profit stop loss and position sizing work together
None of this works in isolation. Your stop loss distance, your position size and your account risk percentage are three sides of the same triangle. Change one without adjusting the others and the whole thing falls apart. A trader who widens his stop because 'the market is more volatile today' but forgets to shrink his position size accordingly has quietly doubled his risk without deciding to.
This is where a lot of blown accounts actually start. Not from one bad trade, but from a string of trades where risk crept up unnoticed because sizing wasn't recalculated every time the stop distance changed. It's tedious to do by hand, which is exactly why so many traders skip it, right up until the month it costs them. Reading about the math behind risk of ruin makes the stakes obvious pretty fast: small, repeated sizing errors compound in ways that feel abstract until they aren't.
How Tradoshi helps you
Tradoshi won't place your take profit or stop loss for you, and it won't tell you where the next resistance sits. What it does is give you the tools to size your risk properly and see, with real numbers, whether your TP and SL habits are actually working. The position size calculator lets you enter your stop distance and your risk percentage per trade, so sizing follows the stop instead of the other way around, and you can set customizable risk rules to keep every trade within the boundaries you decided on when you were thinking clearly.
Once trades are logged, whether through automatic broker import from MT5, MT4, cTrader, a crypto exchange connection, CSV import or manual entry, Tradoshi's statistics show your average win/loss ratio, your R-multiple distribution and your profit factor, so you can actually see if your take profit targets are proportionate to your stop losses across dozens of trades, not just the one you remember. The Trade Review feature lets you replay a trade, tag it with free labels you choose, note your emotional state and check plan adherence, which is exactly how you catch the pattern of moving your stop under pressure before it becomes a habit that quietly drains your account. And the Discipline score gives you a direct read on how consistently you're sticking to your own TP and SL rules over time, rather than just how your P&L looks this week.
A quick framework you can apply today
Start with the chart, not the calculator. Find the level that invalidates your idea, that's your stop. Find the level where the market is likely to react against you, that's your first take profit target. Only after both are marked do you check whether the resulting ratio is worth taking at all. If the ratio comes out at 1:0.8, walk away or wait for a better entry closer to the invalidation point. There is no rule saying you have to take every setup you spot.
Write both levels down before you click buy or sell, not after. This sounds trivial, almost insultingly simple, but it's the single habit that separates traders who survive drawdowns from traders who blow accounts on a single bad week. A pre-written plan doesn't care how you feel three minutes into the trade. That's the entire point of it.
Common scenarios where traders get it wrong
Picture a trader on a five-minute chart, in a trade that's up 2%, target at 3%. Price stalls. He starts refreshing the chart every ten seconds, convinced it's about to reverse. He closes at 2.1%, manually, ignoring his own take profit order. Ten minutes later, price hits his original 3% target anyway. Nothing was wrong with his plan. What broke was his patience, and that's a discipline problem, not a technical one.
Now picture the opposite: a trader whose stop is sitting 1% below entry, clearly marked, clearly justified by a support level. Price approaches it. He convinces himself the support will hold 'because it held twice before', deletes the stop, and watches the position drop another 4% before finally cutting it manually, shaken and furious at himself. The stop wasn't wrong. Removing it was.
FAQ
Frequently asked questions
What is the difference between take profit and stop loss?
The take profit closes your position automatically once price reaches a gain level you set in advance, locking in profit. The stop loss closes your position automatically once price reaches a loss level you set in advance, capping your downside. One protects gains, the other limits damage.
Should I always use both a take profit and a stop loss?
In most cases, yes. Trading without a stop loss exposes you to theoretically unlimited risk, and trading without a take profit often means giving back gains you already had because you kept hoping for more.
How do I calculate the right stop loss distance?
Start from market structure, not from a dollar amount. Identify the price level that invalidates your trade idea, then size your position so that distance corresponds to the percentage of capital you're willing to risk, typically 1% or less per trade.
What risk/reward ratio should I aim for?
A 1:2 ratio is a common baseline, meaning your take profit target is twice as far as your stop loss. At that ratio, a win rate around 34% can still be profitable, though the exact figures depend on your actual costs and execution.
Is it okay to move my stop loss after entering a trade?
Only if the adjustment follows a rule you defined before entering, such as moving to breakeven after a certain gain. Moving it further away because price is approaching it, out of fear of being stopped out, defeats its entire purpose.
Can I take partial profits instead of one single take profit?
Yes, many traders close part of the position at a first target to lock in gains, then let the remainder run with the stop moved to breakeven. It's a valid way to manage the psychological pressure of watching a trade in profit.
Why does my take profit sometimes not get filled even though price touched the level?
This can happen with certain order types or in low-liquidity conditions where the exact price prints briefly without enough volume to fill your order. It's one reason many traders check their broker's execution policy for the assets they trade.
Does the take profit stop loss distance change with volatility?
It should. A stop that's appropriate during a calm session can be far too tight during a volatile one. Basing your stop on a volatility measure like the ATR helps it adapt to current market conditions instead of staying fixed at an arbitrary number.
What is a common beginner mistake with these two orders?
Setting the stop loss based on how much money you're willing to lose rather than where the trade idea is actually invalidated. This produces stops that sit in normal market noise and get triggered before the setup has a real chance to play out.
How can I tell if I'm respecting my own TP and SL rules over time?
Reviewing your trade history is the only reliable way. Looking at how often you moved a stop, cut a take profit early, or removed a stop entirely, across many trades, reveals patterns that are invisible when you only think about the most recent trade.